- May 3
Violin bow technique for beginners
- Meghan Faw
- 0 comments
In this post, I'll cover all the basics of violin bow technique for beginners including how to hold the bow, how to move the bow, how to bow straight, the balance of the bow fingers, how to produce and change your sound, and how to develop fluidity.
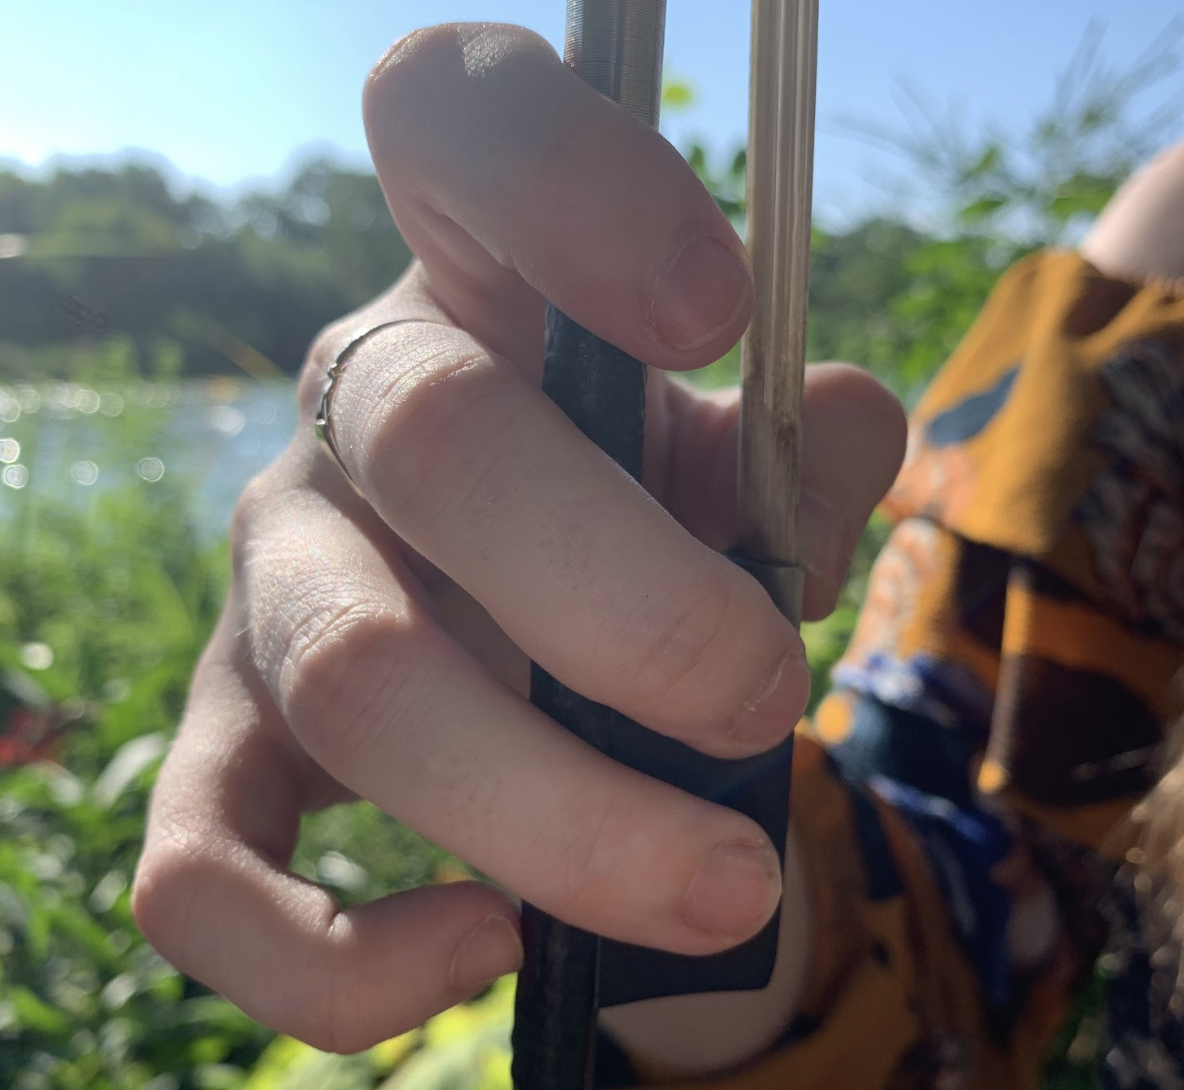
How to hold the violin bow
Developing a proper bow hold is vital for tone production, comfort, and the ability to perform different types of bow strokes. Here's how to learn to hold the bow:
Hold the bow out in front of you with your left hand so that the bow is parallel to the floor. This allows you to focus solely on making the correct shape with your right hand without having to hold the weight of the bow.
Step 1: Place thumb nice and bent halfway on the hair and halfway on the silver metal. Thumb should make contact with the bow on its side, near the nail.
Step 2: Middle and ring fingers wrap around frog and cover white button. It's important these fingers don't creep up the bow.
Step 3: Wrap index finger around the stick, touching between the 1st and 2nd knuckles. Index finger should not be pointing out.
Step 4: Place pinky on the inside corner of the bow nice and curved.
How to move the bow
The bow movement should originate from the elbow. To perform a down bow (when your hand goes down towards the ground), the elbow opens, and to perform an up bow (when your hand goes up towards the ceiling), the elbow closes. It is vital to keep the shoulder still. A great practice technique to ensure that you are not moving your shoulder is to place your upper arm against a wall as you play. This will make it impossible for the shoulder to move and therefore isolate the movement to your elbow.
How to bow straight
Being able to maintain a straight bow throughout our bow stroke is vital for producing an even tone. If our bow is sliding around, the tone will be uneven.
To produce a straight bow, our hand is not going to move in a straight line. Instead, it will be moving in a crescent moon shape. At the frog, start with the bow slightly angled inwards, with your wrist and elbow up. As you draw the bow to the middle, bring your hand slightly inwards. As you draw the bow to the tip, push your bow outwards.
It's important to note that when performing this, we must be careful not to overdo the motion and make our bow crooked. Watch yourself in the mirror to make sure your bow stays straight.
The balance of the bow fingers
In the lower half of the bow, the pinky should be heavy, and in the upper half of the bow, the index finger should be heavy. A great way to get a feel for this is to start at the frog of the bow with your index finger off. Draw your bow to the middle and then stop. At the middle, place your index finger back onto the bow, lift your pinky off, and draw the bow to the tip. Keep the hand as is (index on, pinky off) and go back to the middle. Lift your index finger and place your pinky back on the bow and go back to the frog. That is what you should be feeling during long bows; it is the transfer of weight in the bow hand.
How to produce a pleasing tone
To create a beautiful but full tone, it is vital to use the natural weight of your arm rather than pressing into the string.
4 ways to change your sound
The four factors of tone production are: weight, amount of bow, speed, and contact point. How you use and combine these four factors create your dynamics. The easiest way to create dynamics is to change the amount of bow you're using. More bow is louder and less bow is softer. The amount of weight you are putting into the bow can also change the sound: more weight is louder and less weight is softer. Bow speed is a powerful tool for creating crescendos and decrescendos. To get louder, speed the bow up, and to get softer, slow the bow down. Finally, bow placement matters. Closer to the bridge will be louder and closer to the fingerboard will be softer.
How to develop bow hand fluidity
I'm sure you've noticed when watching professionals play how they have a beautiful movement and fluidity in their bow hand. This is not something that is going to happen overnight, but it is a great goal to work towards as a beginner. There are two "goal posts" for your bow hand: the shape at the frog (or "frog hand") and the shape at the tip (or "tip hand"). At the frog, all of your fingers should be curved and balanced. At the tip, the fingers are straighter and more balanced towards the index finger. Typically going from frog to tip is not an issue. However, when going up bow back to the frog, the fingers need to curve and rebalance, which is typically the part that beginners miss. Be mindful to curve and rebalance your hand as you approach the frog.
What questions do you have about violin bow technique?